Black and White: 2014

Nixon_130217_0989-Edit-2

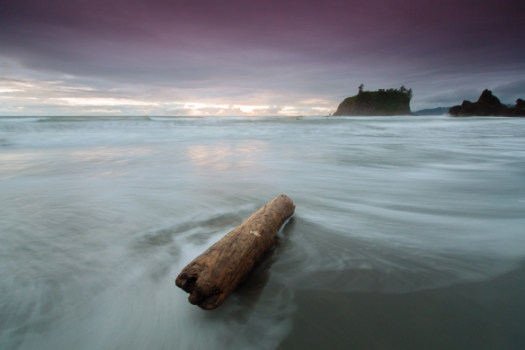
I was pleased to find out recently that the image above ‘After the Storm’ was selected to be included in the on-line annex portion of the Black and White: 2014 exhibition at the Black Box Gallery in Portland. The show opens Friday Sept 5, but images are up on the web now.

This is one of those images that almost never was. There are times when I ‘see’ images that I have to make even though they don’t fit follow the ‘rules’ of photography. In fact, depending on how quick or slow I am there is an internal battle that happens prior to taking the photograph that argues whether this image is interesting and why and whether I should even bother. If I’m fast enough I just take the shot and move on. If I’m too slow, fiddling around with a tripod, getting the right lens etc. there’s time for the doubts to start to take hold. With time, I’ve learned to listen to the doubts, acknowledge them and then take the shot anyway.

You Keep Shooting

Nixon_130517_5940-Edit-Edit

If you’ve ever watched any of Brian Peterson’s short photography instruction videos then you’ll recognize the tag line in the title of this post.

What actually went through my mind as I was reviewing photos from this evening shoot at Rialto Beach was ‘I should have kept shooting’. In my defense the circumstances were challenging. The tide was doing odd things. It would recede and seem like it was going out, but then the next wave would come 2 or 3 feet higher up the beach than it had for the last five minutes. I was getting caught out by this every time and I was getting wet. So what I had was a set of images where the log rolled and was blurred, the tripod moved as it sank in the sand and on and on. It wasn’t until I got to the last image in the set that I had the one at the top of the page. In hind sight I should have stuck with it at least a little while longer. I could have taken my shoes off and rolled up my pants, or just embraced getting wet and dealt with it. Whatever I did I should have kept going.

A lesson for next time – commit to getting the image and stay with it.

Focus Stacking to Extend Depth of Field

Nixon_130516_4876-2
I thought that focus and depth of field were pretty simple. For things where you want to blur the background, focus on the subject, use a low F number (f4 or lower) and you’re good. For flat planes or things that are far away, focus on the subject and use a mid F number (f8 ish). For the grand landscape shot where you want front to back in focus, focus a third of the way into the scene and use a high F number (f22 or above).

This is probably as much as you really need to know to make very good photographs. However, like many things that seem to be simple, if you want to pick away at this and go deeper you can.

In the case of depth of field the only thing that is in focus in your photograph is that which you focused on and everything else on that plane. The rest of the stuff in your photograph that you think is in focus is actually ‘acceptably’ out of focus. For medium and large format cameras, cameras that have ‘movements’, that allow you to tilt the plane of focus this means that you really can get front to back focus, this is an application of the Scheimpflug principle. Those of us using DLSRs are out of luck unless we have a tilt shift lens that will allow you to do the same thing.

So, how to get front to back focus? Easy, take multiple images with different focus points and then blend them together in Photoshop to get what you want to be in focus, in focus. For this kind of shot rather than set the lens to f22, I would recommend that the f stop you choose be the one at which the lens you’re using is optically the best. As a rule of thumb this is usually 2 stops away from wide open, so for an f4 lens this would be f8.

So you’ve taken your shots – in this example I was exploring rain drops on some maple leaves. The images were shot at f4 to blur the background. In one image I focused on the front set of leaves and in the second I focused on the back leaves. Click on the images to see them larger.

Nixon_130516_4875 Nixon_130516_4876

The first thing to do is to open the images in photoshop and load them into separate layers. Once you’ve done that you can then go to the edit menu and select auto-blend layers:
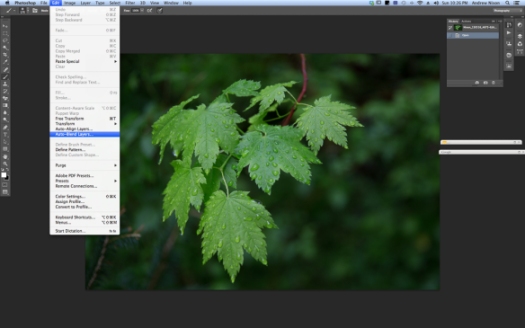
Nixon_130610_

then stack images in the dialog box that appears next.

Nixon_130610_-2

This gives the blended image with good depth of field from the front to back leaves.

Nixon_130516_4875-Edit

A bit more photoshop to remove some of the distracting elements to give the final image.

Nixon_130516_4876-2

Look Behind You!

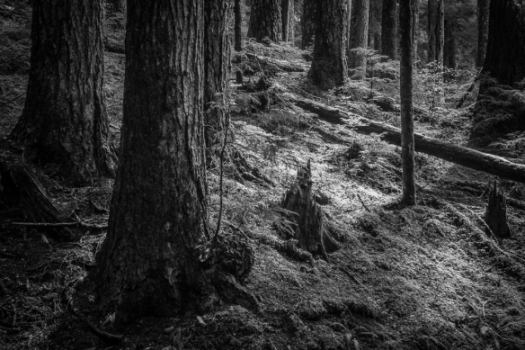
Nixon_130517_5332Look behind you is of course part of the standard audience participation in pantomime, a particularly English form of entertainment. It is also good advice to photographers because often good things are happening all around us and taking a moment to look up, down and all around can result in you spotting other good opportunities.

That was certainly the case for the photograph above. I was on the way to the Sol Duc falls and had stopped to photograph the mossy rocks that are part way to the falls. In taking a moment to look behind me I noticed that there was interesting light in the trees behind me. I shifted my attention to the trees for a little while and was fortunate enough to get a shot that, with the application of my standard B&W preset, resulted in the image at the top of the page.

So far I like this more than my mossy rock pictures and it just goes to show that looking behind you can pay off if you make a habit of it.