Friday Inspiration: Miss Aniela

Aniela_WEB_1600x900

When I first saw the work of Natalie Dybisz aka Miss Aniela a number of years ago now I was absolutely floored. At the time I was still relatively naive with regard to the possibilities of what could be created in Photoshop and had imagined that her surreal imagery were not just a product of a fertile imagination but also prodigious camera skills. The fluency with the tools is certainly there but it a solid understanding of how to shoot so that the required elements are available for the final construction in photoshop. Take a look below to see Miss Aniela at work and to hear her talk about her process.

Friday Inspiration: Julieanne Kost

RejuvinationFlat

As I look around for ‘how to’ resources for lightroom and photoshop one of the people that I continually come back to is Julieanne Kost. Julieanne is the Principal Digital Imaging Evangelist for Adobe Systems, which means that she spends much of her time on the road speaking at conferences and teaching how to get the most out of lightroom and photoshop. I recently worked through her ‘Advance Photoshop Layers‘ course on the CreativeLive site which was excellent. She’ll be teaching during the upcoming Photoshop week on CreativeLive which will be worth checking out.

Many of the examples that Julieanne uses during her demonstrations are from her personal projects. Her book Window Seat is quite interesting and now available as a digital book. Well worth a look. It’s the photoillustrations, such as the one above, that of course really capture my attention given my interest in assembling images from parts. Check out the videos below to see more of how these are constructed:

Friday Inspiration: Brooke Shaden

Brooke Shaden

Often as a beginning photographer you will hear the admonishment, ‘get it right in camera’, this is good advice when your starting out. It provides a restriction, a box to work in, and edges to push up against. It forces you to think about what is the subject, how do you frame the subject so that everyone knows what the subject it, are there lines that you can use to lead the eye through the image and on an on. A multitude of decisions to make on the fly that with practice become second nature, an instinct and perhaps one of the reasons that it can be so hard for some to teach what they are clearly so capable of doing.

I find that I am increasingly less interested in getting it right in camera and more interested in making sure that I’ve captured enough of the scene in front of me to be able to recreate what I felt when I was there. I’ll shoot different shutter speeds to capture waves with just the right amount of blur, I’ll focus at different points in the image so that I can get good front to back depth of field and I’ll shoot a lot of frames. I’ve actually been doing this for a while and it’s taking some time for my post-processing skills to catch up with what I’d felt and imagined I would be able to create when I was stood in various places around the world blasting away.

In looking around at people who were pushing the envelope with regards to creating images Brooke Shaden’s work caught my eye early on, initially through her book ‘Inspiration in Photography: Training your mind to make great art a habit’ and through her CreativeLive Class ‘Fine Art Portraits‘.

Brooke creates worlds that ‘she wishes we could live in, where secrets float out in the open, where the impossible becomes possible’, often using herself as the model for the photograph. She is able to create these new worlds using relatively simple techniques in photoshop.

Looking at some of the behind the scenes videos on her You Tube channel made me realize how much you could do if you just understood just a few of the tools in photoshop deeply. Watch Brooke in action and hear her talk about her work and process in the videos below.

Practicing at Practicing

Nixon_130515_4122-Edit

I recently upgraded my copies of Lightroom and Photoshop which of course brought with it the headache of making sure that all the plug-ins that I have for both programs were installed and working properly. In photoshop my plugins are ‘grayed out’ and unavailable to be fired up unless you have a photo open. So to solve that problem I opened one of the leaf pictures that I had intended on working on but hadn’t gotten around to it. I opened the leaf image and started OnOne Software’s “Perfect B&W’ plugin. I tried some of my favorite black and white presets. There are lots panels with lots of sliders that you can use to further tweak the image. One panel that I wasn’t familiar with was the ‘blending’ and so I spent some time playing with the various options and was surprised and pleased to discover that using the overlay mode gave me the image above. I liked it so much more than the image I started with which is below.

Nixon_130515_4122-2

Could I have gotten there with just Lightroom or Lightroom and Photoshop? Maybe… I realized that the image out of the OnOne plug in had a vignette (easy to do in Lightroom), and was a bit crunchy – had either a lot of contrast or clarity or a combination of the two added.

Adding a vignette was easy – I generally use ‘Post-Crop Vignetting’ and dialed in -33 using the highlight priority option in LR5.

Leaves_Vignette

Cruchiness wasn’t so easy. I thought that clarity would give the effect that I was looking for. Ramping clarity up to 100% gives the crunchiness I was looking for but there’s still something missing.

Leaves_Clarity

Adding a strong constrast curve gets us closer but the image is too green.

Leaves_Contrast

Finally desaturating a little using both saturation in the Presence panel and also the green slide in the HSL panel gives the image below.

Leaves_Desat

A vast improvement over the original and I like it better than my target image. I found this to be a useful exercise in exploring the power of Lightroom which I’m sure will come in useful.

Focus Stacking to Extend Depth of Field

Nixon_130516_4876-2
I thought that focus and depth of field were pretty simple. For things where you want to blur the background, focus on the subject, use a low F number (f4 or lower) and you’re good. For flat planes or things that are far away, focus on the subject and use a mid F number (f8 ish). For the grand landscape shot where you want front to back in focus, focus a third of the way into the scene and use a high F number (f22 or above).

This is probably as much as you really need to know to make very good photographs. However, like many things that seem to be simple, if you want to pick away at this and go deeper you can.

In the case of depth of field the only thing that is in focus in your photograph is that which you focused on and everything else on that plane. The rest of the stuff in your photograph that you think is in focus is actually ‘acceptably’ out of focus. For medium and large format cameras, cameras that have ‘movements’, that allow you to tilt the plane of focus this means that you really can get front to back focus, this is an application of the Scheimpflug principle. Those of us using DLSRs are out of luck unless we have a tilt shift lens that will allow you to do the same thing.

So, how to get front to back focus? Easy, take multiple images with different focus points and then blend them together in Photoshop to get what you want to be in focus, in focus. For this kind of shot rather than set the lens to f22, I would recommend that the f stop you choose be the one at which the lens you’re using is optically the best. As a rule of thumb this is usually 2 stops away from wide open, so for an f4 lens this would be f8.

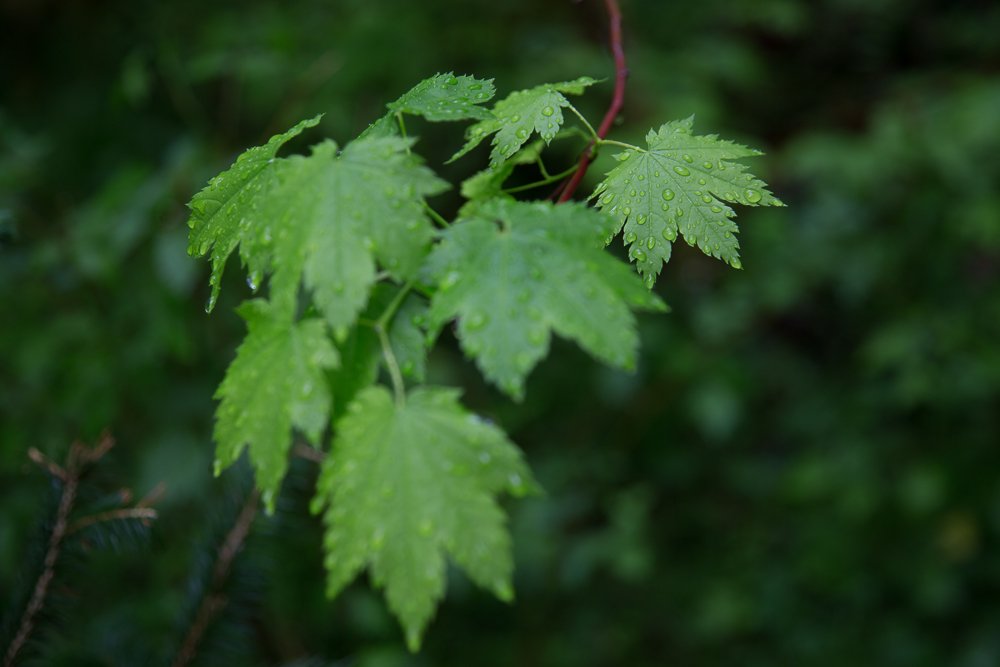
So you’ve taken your shots – in this example I was exploring rain drops on some maple leaves. The images were shot at f4 to blur the background. In one image I focused on the front set of leaves and in the second I focused on the back leaves. Click on the images to see them larger.

Nixon_130516_4875 Nixon_130516_4876

The first thing to do is to open the images in photoshop and load them into separate layers. Once you’ve done that you can then go to the edit menu and select auto-blend layers:
Nixon_130610_

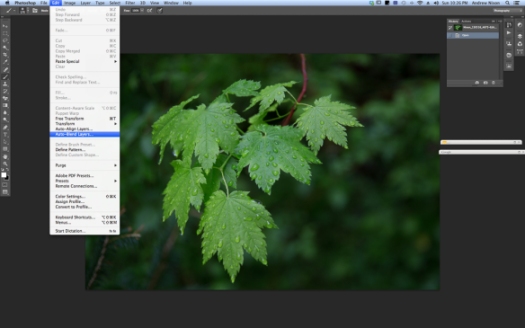
then stack images in the dialog box that appears next.

Nixon_130610_-2

This gives the blended image with good depth of field from the front to back leaves.

Nixon_130516_4875-Edit

A bit more photoshop to remove some of the distracting elements to give the final image.

Nixon_130516_4876-2

Taking a Mulligan

Nixon_120604_0763-Edit-Edit

Everyone deserves the opportunity to have another go, to reinterpret and reimagine their work. The more that I understand lightroom and photoshop the more possibilities there seem to be. In an interview with Michael Kenna I recently read he said that one of photography’s greatest strengths is that it is (or at least was) tied to reality. That tie is clearly broken for those that wish it to be. While I’ve yet to push reality hard, I have started to play a little. The image at the top of the page is a reworking of the image that I posted a few weeks ago based on the feedback that i received here and to fix a few things that bugged me which I didn’t know how to fix at the time. So a mulligan, a do over, let me know your thoughts.

A Commitment to Becoming a Better Photographer

Nixon_121212_4148
To follow up on my previous post I thought that I’d share some of the things that I’d done to improve my photography and hopefully they may be useful to you. At the time I did all of this stuff I felt that I was a late starter and wanted to accelerate my learning as much as I could. This meant using the expertise and experience of photographers that I liked to quickly get a solid foundation. Please do chime in with your thoughts and comments too.

1. Find your true calling. Work out what appeals to you, what repels you. Start a scrap book real or virtual of images that appeal to you. Make a list of common attributes – color or black and white, landscape, portraiture, wildlife, fashion, wedding, dig a bit deeper what else do these have in common, what differentiates them.

2. Find a mentor. Have you found yourself gravitating to one or two photographers? Study what they’ve done and how they got the shots you particularly admire. Of course if they’re alive today they probably teaching workshops – take a workshop with them and get some advice from your photographic hero. Not only will you get some insight into how they achieve their signature works but you’ll also get some feedback on your own work.

3. Get the right gear. Figuring out what gear your heros are using to get the shots you admire and get the same stuff. Somethings you’ll want to buy now, others you should rent. But without getting the gear to get the shot you won’t get the shot. A good example for landscape photographers is a rock solid tripod – get a good one and it will last you for years.

4. Do what your heros do to get the shot. When I was at Alison Shaw’s Workshop on Martha’s Vineyard in 2009 I was bemoaning my lack of progress to Alison’s assistant Donna Foster. Donna quickly pointed out that there was a progression to my work but that my biggest problem was that I wasn’t shooting in the best light and that if I wanted to improve I should find some time to get out early or late and shoot when the light is good.

5. Get feedback on your work. There are a number of ways to get comments on your work I prefer one on one portfolio reviews with someone who is going to be brutally frank. Feedback from workshop instructors is also very useful, as can be comments from friends whose opinion you trust and value.

I hope that you found this useful. I’d be delighted to hear what you’ve done to improve.

Friday Inspiration: Jerry Uelsmann

Jerry Uelsmann is well known for his masterful photo-composites that are achieved in the traditional darkroom. While it is true that this kind of composite can now readily be created with the help of Photoshop, for me, few are able to create the kind of surreal masterpieces that Jerry has been able to produce over the years.

I plan to visit the exhibition of Jerry’s work ‘The Mind’s Eye: 50 Years of Photography by Jerry Uelsmann’ at the Peabody Essex Museum in the coming weeks. Check it out on-line here and read the Boston Globe review here.

Listen to Jerry talk about his photographic process in the video below:

For the full length video of Jerry discussing his work visit http://www.maurofiorese.it/ and also see his interview with Randi Lynn beach of PixChannel

25 Photography Books I'd Take to a Desert Island

20120318-163912.jpg

As you can probably tell from the photo above, my book collection is getting a little out of control. While I would have a hard time paring it down and parting with any of the books I thought that it would be a fun exercise to select 25 ‘how-to’ books to hang on to. I decided to select a set of ‘how-to’ style of books. Some a very practical nuts and bolts of how to use Lightroom or Photoshop, some point the way ‘how-to’ using examples from the authors, some feature exercises designed to help you find your way of capturing images, some ask more questions than they answer and finally some help with talking about your work and sharing it with the world. These are all books that I still find useful, although not necessarily ones that I would recommend to someone who’s just picked up a camera. I’m sure this would be different to your list and would be happy to hear what you would have included. A ‘top ten’ from my collection of art books, monographs etc. in the coming weeks.

Scott Kelby’s 7-Point Sytem for Photoshop CS3
Adobe Photoshop Lightroom – Martin Evening
Adobe Photoshop Lightroom – Scott Kelby
Adobe Photoshop CS5 for Photographers- Martin Evening
Adobe Photoshop CS5 for Photographers: The Ultimate Workshop

Adobe Photoshop Masterclass: John Paul Caponigro
Welcome to Oz
The Photoshop Darkroom
George DeWolfe’s Digital Photography Fine Print Workshop
B&W Printing: Creating the Digital Master Print

The Photographer’s Eye
The Photographer’s Vision
The Photographer’s Mind

Visual Poetry
Photographing Childhood

Within the Frame
Visionmongers

The Moment it Clicks
Examples: The Making of 40 Photographs

Landscape Within
Landscape Beyond
Finding the Picture

Criticizing Photographs
Why Photographs Work
Publish Your Photography Book

The Circular Journey from Vision to Print

It struck me over the weekend that the path to realizing our vision, whether that’s on the computer monitor or on paper for the old school folks, is circular. I’ve been mulling over technical skills and aesthetic choices over the last couple of weeks resulting in the postings last week regarding conversion to black and white and also getting a better understanding of our sense of aesthetics. The final image to me then is a result of combining these with creativity. Simply put:

Realized Vision = Aesthetic Choices + Creativity + Technical Skills

I often feel that many of the initial photographs in a series are the result of happy accidents, either in the field when I just try something for the sake of it or when I’m back in front of the computer when again I play the game of ‘what happens if I do ….’. Taking that experience and then repeating it in different circumstances and situations then allows me to build that series. Whether it’s playing around with toy camera effects, shooting in black and white, or shooting long exposures all have been informed by what’s gone before. Having a better sense of the possibilities, particularly for post-processing of my images, means that I am ever more aware of possibilities for my photography.