Focus Stacking to Extend Depth of Field

Nixon_130516_4876-2
I thought that focus and depth of field were pretty simple. For things where you want to blur the background, focus on the subject, use a low F number (f4 or lower) and you’re good. For flat planes or things that are far away, focus on the subject and use a mid F number (f8 ish). For the grand landscape shot where you want front to back in focus, focus a third of the way into the scene and use a high F number (f22 or above).

This is probably as much as you really need to know to make very good photographs. However, like many things that seem to be simple, if you want to pick away at this and go deeper you can.

In the case of depth of field the only thing that is in focus in your photograph is that which you focused on and everything else on that plane. The rest of the stuff in your photograph that you think is in focus is actually ‘acceptably’ out of focus. For medium and large format cameras, cameras that have ‘movements’, that allow you to tilt the plane of focus this means that you really can get front to back focus, this is an application of the Scheimpflug principle. Those of us using DLSRs are out of luck unless we have a tilt shift lens that will allow you to do the same thing.

So, how to get front to back focus? Easy, take multiple images with different focus points and then blend them together in Photoshop to get what you want to be in focus, in focus. For this kind of shot rather than set the lens to f22, I would recommend that the f stop you choose be the one at which the lens you’re using is optically the best. As a rule of thumb this is usually 2 stops away from wide open, so for an f4 lens this would be f8.

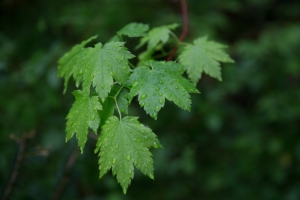
So you’ve taken your shots – in this example I was exploring rain drops on some maple leaves. The images were shot at f4 to blur the background. In one image I focused on the front set of leaves and in the second I focused on the back leaves. Click on the images to see them larger.

Nixon_130516_4875 Nixon_130516_4876

The first thing to do is to open the images in photoshop and load them into separate layers. Once you’ve done that you can then go to the edit menu and select auto-blend layers:
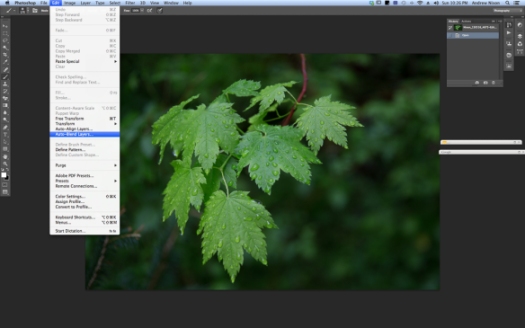
Nixon_130610_

then stack images in the dialog box that appears next.

Nixon_130610_-2

This gives the blended image with good depth of field from the front to back leaves.

Nixon_130516_4875-Edit

A bit more photoshop to remove some of the distracting elements to give the final image.
Nixon_130516_4876-2

My 5 Keys to A Great Workshop Experience

My recent experience at Art Wolfe’s Olympic Peninsula Workshop, while not bad per se, led me to reflect on what my ideal workshop would look like. My goals for any workshop are to have fun, make friends, learn something and if I get some photographs that I like so much the better. With that in mind here’s what i came up with.

I prefer relatively small groups

The reason for this is two fold. I want to get to know the people that I’m with for the duration of the workshop. Some of these folks often know more about the technical aspects of photography, or the software than the instructor does. Handy to know these people.

I want to get to know the instructor and allow the instructor to know me.
I feel like this can only be a good thing when it comes to learning and overcoming challenges that I’m dealing with.

Daily critiques of new work
While it can be painful, I find that daily critique of the images that the group has created is a powerful tool to improve the standard of the work that the whole group does. Which leads to the next point.

I want to feel safe enough to step outside of my comfort zoneOne of the things that workshops afford us is the opportunity to try things and quite likely fail spectacularly. I’m not likely to do this or at least share the results of my experiments if I don’t feel safe.

I don’t want to be rushed
Workshops are a funny vehicle for learning. Often you are sprinted from one location to the next without an opportunity to return and put what you’ve learned into practice. I completely understand the ‘photo tour’ aspect of many workshops and this is great if you intend on returning to select locations on your own to fully work through the photo possibilities that it offers. Otherwise I prefer at least similar locations that would allow me to refine my thinking about how to approach particular subjects.

What would help make the ideal workshop experience for you? Leave your suggestions in the comments section.

Art Wolfe's Olympic Peninsula Workshop Comments


Or I just flew in from Seattle and boy are my arms tired.

I recently attended Art Wolfe’s Olympic Peninsula workshop. What an amazing place the Olympic Peninsula and the Olympic National Park is – Rain forest, Mountains and the ocean. What more could you ask for? It was quite an experience.

I was expecting a relatively intimate workshop (I had been under the impression that it would be 12 people) that would give us all a lot of time with Art and Libby and Jay. It turned out to be a much bigger group, ~30 participants and 4 or 5 additional instructors/assistants. Not that is a bad thing, the staff were all pretty attentive both in the classroom and in the field, although I found it difficult to keep track of peoples names, whether they were with our group or not and whether they were a participant or instructor. We didn’t spend too much time in the classroom because the weather was ‘perfect’ for photography, it was overcast the first day, overcast and rainy the second, but then cleared so that we got broken cloud cover for a sunset at Second beach. Very cool the way the weather worked out perfectly.

One of the reasons that I took the workshop was to get a better sense of photographing in forests and there was no shortage of opportunity to photograph in the forest. Our first stop was Marymere falls and then on to the Sol Duc. Being in dense old growth forest I was overwhelmed by the clutter and so it wasn’t until I was in the Hoh Rainforest the following day that I actually started seeing potential shots. But then however I was battling a couple of technical challenges that I hadn’t expected – it was raining, hello rainforest – which meant that I had to clean off the front element frequently otherwise my shots would be obliterated because of raindrops. The second issue that I was frankly surprised by was fogging. I was using a polarizer to take the sheen off the green and found that the front element would fog under the polarizer and so I had that to contend with too. Most if not all of the shots of the forest I ended up with are marred by one or other of these issues.

While I may not have any photographs from the forest that I liked, I did begin to ‘see’ potential photographs which was a significant step forward for me. I’m looking forward to going back for more!

Friday Inspiration: Jay Goodrich

I’m in the Pacific Northwest this week to attend a workshop with Art Wolfe. It was through researching potential workshops with Art that I came across Jay’s work and have been following his blog for a couple of years now. His outdoor work, covers a wide spread of nature, landscape and adventure photography but he also builds on his architecture training to make some stunning photographs of buildings. Goes to show that the more you know your subject the better the photographs will be.

It’s hard to know the person behind photographs when your interaction has been purely electronic stalking but Jay’s about page reinforces the notion that I had of a pretty mellow, if not passionate and intense guy. Do all those fit together I think so. Get a sense for yourself in the interview with Jie from an episode of ‘Framed‘ last year.