Trouble with Tripods – Finale: So Long Old Friend

IMG_3175

IMG_3179

We’ve been having an odd winter here in New England – lots of snow over a very short period of time. We’ve had about 80 inches (or ~ 2 m) of snow in the last 20 days with more coming down as I write this. During the last storm I made the misguided decision to head out to photograph in the nearby woods. Misguided because the visibility was poor and the snow plows were not managing to keep up with the snow which made driving interesting. Once at the woods the snow was quite deep even on the normally well trodden paths which made for slow going.

Increasingly I will explore ideas with my iPhone before pursuing them further with my DSLR. A couple of the images from my iPhone are above, I was at least thigh deep in the snow in this part of the woods. As I maneuvered my tripod around in the deep snow I heard a funny creaking noise. At first I thought that was the wind blowing the trees, but there wasn’t any wind. Then I thought it must be someone else out and about, but I could see anyone. Very weird. I picked my tripod up out of the snow to get it into a better position and and two of the tree legs came up, the third stayed in the snow. It had come detached where it joined the metal frame. That was pretty much the end of my photography for the day.

IMG_3214-1

IMG_3215-1

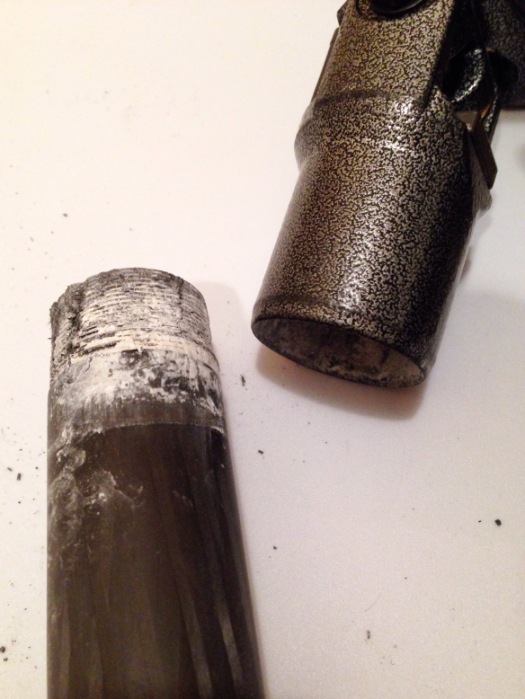
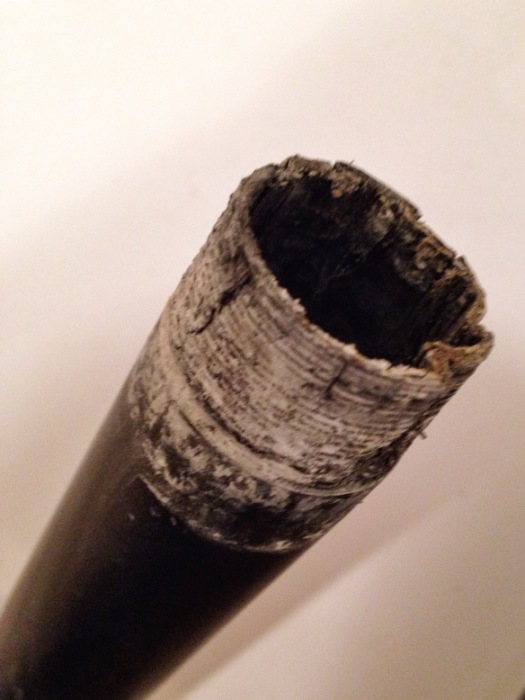
I’m not sure if you can tell from the images above but the carbon fiber leg where it joined the frame had delaminated and was soft. It was also crinkled which explained why the tripod leg did not fully close – there was always just a tiny fraction of leg extended. The metal also looks like it is badly corroded. While I may send this old tripod back to Gitzo I’m not holding my breath that they would be able to help me out.

I do have a new tripod that I’ve been using as a travel tripod – a Really Right Stuff 24L. I may now supplement this with the 34L, a beefier version of the 24L. The 24L to me seems a bit weedy, the lower sections of the legs are particularly thin and make me wonder how solid the tripod can really be. I guess time will tell.

Print Your Work!

Processed with VSCOcam with kk2 preset

I’ve been involved in a couple of conversations recently about the value of printing your work. With most of us now using digital in one form or another there’s an overwhelming temptation to let your photographs sit on the computer, or on the web in one place or another and not be printed.

There are a number of reasons that we could debate for printing – prints have historically been the archival record – when the house is burning down you’re not going to run in and save your server, network attached storage or desktop computer in the way that you might have saved the family photo album. I’m sure everyone has their work backed up both in the cloud and physical drives at a secure distant location so this is less of a concern.

I would argue that printing does make you a better photographer though, whether your intended output is for the web or not. Prints are less forgiving than web and so you have to get it right, sharp where sharp is needed and appropriate and a file that is large enough to support the print size which forces you to ‘get it right in camera’

Even though the cost of ink jet printers has dropped substantially and the resources for obtaining a good print increased in equal fashion, making it quite possible to make good prints yourself at home, there are a number of companies that will make the prints for you. I was experimenting with the print service from Artifact Uprising while I was in Japan recently.

As I mentioned previously I’ve been using my iPhone camera as a tool to help me break out of the rut that I’ve felt that I’m in. I thought that If I could take 250 images that I like over the course of the year it ought to be possible to cull those to make a 50 image book as a record of the year. I’d heard good things about Artifact Uprising and wanted to try them out before I got to the book stage.

One morning while I was in Japan recently I had a few moments to kill and so I uploaded 5 or so images that I’d posted to instagram to the artifact uprising site using their mobile app and ordered a pack of prints. The whole operation took less than five minutes. When I got home from Japan I had a stack of amazing prints (5×5) on really heavy paper stock that I could handout to friends and family and to have as a record of the trip.

Not big prints for sure but a fun way to get my images off my phone and for me to start to look at them and really think about how they work as images. Give it a go, you won’t be disappointed.

Future Thinking – It's Black Magic!

back-front

I’ve been interested in film making for a very long time, almost as long as I’ve been interested in photography. I never really engaged in film making in a meaningful way but it’s something that always has stayed in the background as something that I pay attention to.

I have yet to figure out how to integrate film making and photography. While the skills of making a still image and framing a film shot may be complementary (see Greg Crewdson’s work as an example) if you’re taking video your not taking photographs and vice versa. Of course increasingly the DSLRs that we have a very capable video cameras making this back and forth much easier. I’ve seen some photographers talk recently about the ‘long still’, videos that were taken with the same set up that had been used to take a still. Easily done once you’ve got the image you were interested in, just a button push away. Something to think about and experiment with if you haven’t already.

I’m more interested in documentary film making, particularly telling the story of people making things – explorations of artists and their process is a particularly appealing topic to me. Of course I could use DSLRs to do this but my imagination was captured by the possibilities with the iPhone and in particular the app FilmicPro.

To see what people have been able to achieve using the FilmicPro app check here.

There also some third party add-ons that help when using the iPhone as a video camera. Susan Roderick from CreativeLive reviews some of the better ones here.

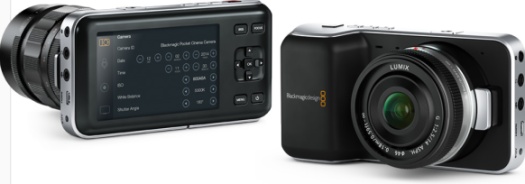
As I was packing my gear into the car after photographing at a beach in California a few weeks ago a couple arrived and unpacked their camera gear. They had what looked like an iPhone on a video tripod I of course asked what the camera was – it turned out to be a black magic pocket. I’d seen ads for the Black Magic cameras but wasn’t familiar with the pocket model.

The pocket camera body is essentially the size of an iPhone but capable of hi-res video and very flexible in terms of third party add ons. The pocket camera has four thirds lens mount but using available adapters you could use your existing lenses on the camera. This then starts to sound very interesting indeed – high quality digitial cinema cameras without any need to buy new lenses. The pocket black magic camera isn’t much bigger than an iPhone and could easily fit into my camera bag.

You have to jump up to the ‘regular size’ Black Magic cameras are capable of recording 4K video, the resolution where it starts to be possible pull a single frame and use that as a large print. Check out this link for more about that. Hopefully this will soon make it’s way into the pocket model too.

I’m surprised that I haven’t heard more about this idea of pulling stills from video, perhaps I’ve just had my head in the sand and ignored this as an option but I anticipate hearing more about this as the technology improves and the price continues to drop. It certainly seems worth exploring and solves the problem of how you could integrate film making with photography.

Beavertail Lighthouse Scouting Trip

Nixon_141120_4498

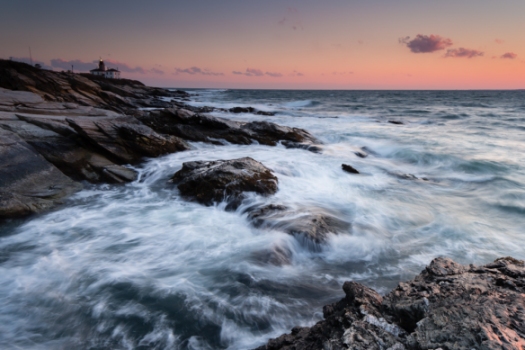
What’s the weather like where you are? Here on the New England coast it’s been bitterly cold this last week – a polar vortex the weather guys seem to call it. I was in Jamestown recently to photograph around Beavertail lighthouse with the temperature cold and feeling colder because of the wind chill.

This was the first time that I’d actually gone to Jamestown with the intention of photographing around the lighthouse and, although I had prepared as well as I could, I wasn’t prepared for the difficulties that the cold would present. I was playing with the 24 mm tilt-shift lens again but what I quickly found was that I was too clumsy with gloved hands to operate the buttons and knobs that you need to work to adjust the lens. I struggled along the best that I could but was very frustrated by the time I was done.

I did however get a couple of images that I liked and managed to find a couple of fun spots that I plan to return to in the coming weeks.

Tripods – Care and Maintenance of the Three Legged Beasties

Nixon_140928_2373

I was working on my project “Everyday Objects’ this weekend and shot the image above of what I believe is a wasp’s nest with my newly renovated tripod.

In reading about how to care for and maintain your tripod I actually went and read some of the manuals that are supplied with Gitzo, Really Right Stuff etc. style tripods. Not something that I would normally do being the type of person who shuns manuals in favor of a more intuitive exploration of the functions of a new piece of gear. You should have seen me trying to start the rental car in Iceland – but that’s a topic for another day.

Really Right Stuff tell you that ‘Sand and saltwater are your tripod’s worst environmental enemies.’ About half, if not more, of my tripod use is at the beach so it’s hardly any wonder then that my tripod finally started to complain recently after many years of good service.

Carbon fiber tripods such as my old Gitzo 1325 are generally simple to look after and should last for an exceptionally long time. I’d hoped that I’d only have to buy one tripod which now seems like wishful thinking but a few simple precautions should keep your tripod in good shape.

General Cleaning

Wipe down the tripod legs with a damp cloth to remove mud, sand and salt water. Dry the legs off before collapsing.

Check all metal fittings for signs of corrosion and replace as necessary. Spare parts should be available from the manufacturer. Here’s a pdf of the parts for my 1325 tripod to see how it breaks down. The Gitzo Service Center can be found here. For old tripods spare parts can be a pain to find. It pays to anticipate future needs!

Disassembly

Disassembly and a more thorough cleaning is recommended after immersing one or more of the leg joints in water and getting water up inside the tripod legs.

This is a case of do as I say rather than do as I do. Although I’m sure if I followed my own advice I would have had less problems over the years.

Water, mud, sand or saltwater inside the legs causes a number of problems, including :

  • initiation of corrosion on some of the internal parts that is difficult to diagnose until too late
  • causes the bushings to swell making it difficult to open the tripod legs

Taking the tripod apart is remarkably easy even though I was convinced that I would break the whole thing if I attempted it. While the process described here is for the Gitzo 1325 from digging around it looks as though most of the equivalent tripods from other manufacturers come to disassemble in a very similar way.

Things to have on hand during disassembly:

  • Spare bushings if you’ve been having problems
  • Shop rags or paper towels for clean up and drying the legs.
  • WD-40, used sparingly this can cut through the muck on even the most sadly neglected of tripods.
  • An old tooth brush is handy to clean grit and grime from the tripod collars and threads.
  • A good lubricant for the nicely cleaned threads. I used Lanocote because I had a tub handy.

Here’s the lower section of one the legs:

IMG_1706.JPG

Diassembly is simply a matter of unscrewing the leg collar all the way until it releases as shown here:

IMG_1707.JPG

Hopefully you can then just pull on the leg and it will smoothly come free (- or not if you read my previous post on my disassembly efforts):

IMG_1710.JPG

The carbon fiber bushing appears to sit under the join of the two legs and is compressed as you screw the collar tight, holding the leg where you’ve set it. You can see where it normally is in the picture above.

The plastic guides keep the leg centered as it slides inside the fatter leg above. The plastic bushings were particularly salty but cleaned up nicely as shown below.

IMG_1709.JPG

If you look carefully you can see that the salt build up has caused some wear of these guides. I also found that it could be tricky to get these guides to sit in groove in the tripod leg properly after removing them for cleaning. This was easily fixed by compressing them as shown below.

IMG_1703.JPG

This compression was sufficient to close the gap that you can see in the upper guide which meant that the guide seated more closely into the groove on the tripod leg making it easier to reassemble the leg.

Getting everything back together is simply a matter of reversing the process. It’s relatively easy to do, although it might take you the best part of an evening to clean up the entire tripod or longer if you have to deal with stuck leg joints as I did!

Good luck and let me know if you have any suggestions.
Developing Projects

Nixon_140808_7989

I’ve been going back through the archives looking for images that could be used to extend exisiting projects and identify themes to be developed for new projects. It can be a nice surprise to find images that were previously overlooked, a little bit like finding money in a coat when you wear it for the first time in a long time.

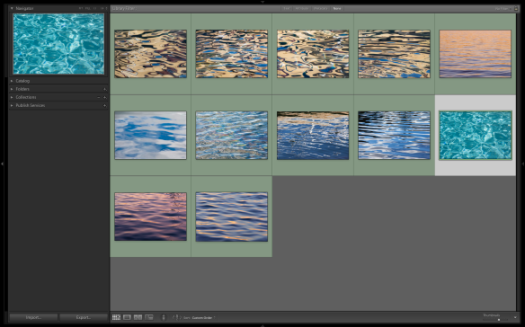
One of the things that I’ve been doing while I look through my images is to set up smart collections in lightroom that will be populated when certain criteria are met. I have a simple color scheme that I use to label my photos – I mark images that I’ve worked on green, ones that are to be worked on yellow and ones to be deleted red. All the photos labeled green (the keyboard shortcut to do this on the mac is simply by pressing the number 8) will then appear in my smart collection folder ‘selects’. I’m in the process of refining this collection using keywords that will then put images into project folders – ‘coast’ captures the images at the coast that I like so much, ‘trees’ is my tree project that is slowly coming along and ‘water abstracts’ is a project that came to light as I was going through the archive. The image above is one from the water abstracts collection. A screen grab of this collection is below.

Screen Shot 2014-08-24 at 6.34.17 PM

There’s definitely a ‘one of these things is not like the others’ element to this collection that I will need to resolve at some point, either by punting the offending image or building additional images into the set so that it is no longer a singleton. Having a number of clarified projects percolating in the background means that I’m sensitized to the opportunities for adding to these projects which will hopefully allow them to mature more rapidly.

How about you? Are you thinking about the images that you make in terms of projects? Any approaches, tricks, techniques or thoughts to developing projects that you want to share? I’d love to hear them

My Evolving Sensor Cleaning Method

Ever wonder how the camera manufacturers clean sensors? I have. Skip to min 13:20 in this video to take a look at what the Leica folks use.

My method for cleaning my gear has largely been informed by what I was taught by Moose Peterson in his DLWS workshops.

The simple process that I was following until very recently was to:

  • use the camera’s self cleaning system, which sometimes actually works(!)
  • use a blower to get rid biggish loose bits of dust
  • use a brush such as the Arctic butterfly to remove what wasn’t removed by the blower

If I decided that there were just too many dust spots remaining after a couple of passes with the brush I would then go ahead with ‘wet cleaning’. I used to think that wet cleaning was ‘one pass and your done’ but with practice I realize that it’s not unusual to need 3 or 4 passes with the sensor swabs to get the sensor clean. Occasionally, as was the case on a recent trip, during the initial wet cleaning I manage to drag oil from around the sensor on to the sensor itself and then have to do an even more rigorous cleaning. Visible Dust have a couple of different solvents for wet cleaning that I use. I generally start with VDust plus and then go to Smear Away if I need to.

As an aside, Visible Dust products are expensive and with the need for multiple passes for wet cleaning it’s easy to blow $20 or more in a single cleaning session. That can be a real pain in the wallet if you need to clean your sensor at the end of every day or before every shoot. Because of this many people are switching to Copper Hill products which offer a cheaper option for swabs that involves making up the swab yourself. I tried their products way back when and was never satisfied with how the swab went together. In this video from Moose it looks like Copper Hill redesigned the handle and now the swabs are easier to assemble.

So what’s changed with my process? I’m now incorporating the sensor gel stick that you saw in the Leica video above into my ‘dry’ cleaning method. While I could probably skip the arctic butterfly, and probably will, as I get more comfortable with the sticky pad I’m still using the brush prior to using the . Moose mentions that he didn’t get a year out of his sensor gel stick, so that’s something to keep in mind.

Check out the instructional video below for a how-to tutorial with the sticky pad.

Memory Matters

1031507

I’ve been nerding out looking at memory cards over the last week or so. Although in principal I don’t need ‘fast memory’ cards the latest gadgets always catch my eye. So it was with these Lexar cards that are 1066x, sounds faster than my 300x cards but 1066 times what. It turns out this is in reference to the speed of the original CD-ROM of 150 KB/sec. So cards that are rated 300x have sustained write speeds of 45Mb/s and cards that are rated 1006 will have write speeds of ~160Mb/s. To me this seems important in two places – if you’re shooting fast action such as sports or chasing your kids around and when you’re downloading the cards where faster cards will download faster.

It seems that even with the faster cards for the long exposures that I take at the fringes of the day the write time is roughly equivalent to the length of the exposure. So a 20 second exposure will mean a 20 second write. While I know I ought to be more relaxed about it that can seem like an awfully long time between shots.

The other thing that I’m trying to balance in addition to write time is how large should the card be. I like to have enough memory cards on hand so that when I go off shooting for a couple of days I don’t have to reformat any of the cards. This gives me a third back up in addition to storage on my hard drives. I have typically settled on 16GB cards as a good size, I get a good number of images per card – often a morning or an afternoons shoot per card – without it being too many that if I were to lose the card or if it were to crash I wouldn’t have lost the entire trip.

Focus Stacking to Extend Depth of Field

Nixon_130516_4876-2
I thought that focus and depth of field were pretty simple. For things where you want to blur the background, focus on the subject, use a low F number (f4 or lower) and you’re good. For flat planes or things that are far away, focus on the subject and use a mid F number (f8 ish). For the grand landscape shot where you want front to back in focus, focus a third of the way into the scene and use a high F number (f22 or above).

This is probably as much as you really need to know to make very good photographs. However, like many things that seem to be simple, if you want to pick away at this and go deeper you can.

In the case of depth of field the only thing that is in focus in your photograph is that which you focused on and everything else on that plane. The rest of the stuff in your photograph that you think is in focus is actually ‘acceptably’ out of focus. For medium and large format cameras, cameras that have ‘movements’, that allow you to tilt the plane of focus this means that you really can get front to back focus, this is an application of the Scheimpflug principle. Those of us using DLSRs are out of luck unless we have a tilt shift lens that will allow you to do the same thing.

So, how to get front to back focus? Easy, take multiple images with different focus points and then blend them together in Photoshop to get what you want to be in focus, in focus. For this kind of shot rather than set the lens to f22, I would recommend that the f stop you choose be the one at which the lens you’re using is optically the best. As a rule of thumb this is usually 2 stops away from wide open, so for an f4 lens this would be f8.

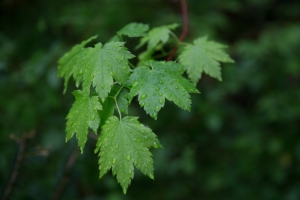
So you’ve taken your shots – in this example I was exploring rain drops on some maple leaves. The images were shot at f4 to blur the background. In one image I focused on the front set of leaves and in the second I focused on the back leaves. Click on the images to see them larger.

Nixon_130516_4875 Nixon_130516_4876

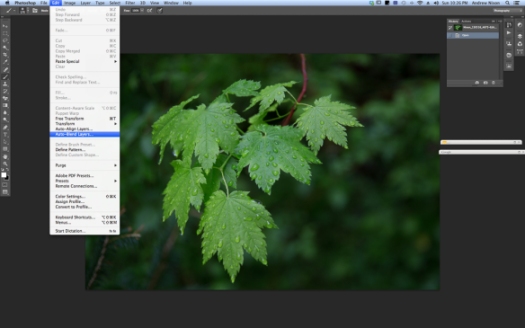
The first thing to do is to open the images in photoshop and load them into separate layers. Once you’ve done that you can then go to the edit menu and select auto-blend layers:
Nixon_130610_

then stack images in the dialog box that appears next.

Nixon_130610_-2

This gives the blended image with good depth of field from the front to back leaves.

Nixon_130516_4875-Edit

A bit more photoshop to remove some of the distracting elements to give the final image.

Nixon_130516_4876-2

Object of Obsession: Linhof Techno

Probably like most people I like things that are both functional and nice to look at.  Whether it’s my OXO travel mug, the custom made Timbuktu messenger bag that I have used for the last 5+ years or those things that are out of reach – Aston Martin cars, Morris 42 ocean going sailboat to name just a few things.

For me the Lindhof Techno falls into the group of things that are out of reach.  I’ve never shot film, never used a medium format camera and yet this camera appeals to me on all kinds if levels. It’s a digital based system using the medium format backs from companies like Hasselblad or Phase One. High resolution files and big prints! That it is a medium format system with bellows, means that you can get excellent front to back depth of field. Something that you would have to use either focus stacking or a tilt shift lens on a DSLR to get close to. It looks like it would be work to set up an use – this more deliberate style of photography is something that increasingly appeals to me rather than the run and gun approach that I all too often fall into with my DSLR.

I’d love to rent one of these systems for a couple of weeks to see how I’d get along with it – let me know if you know where I could rent one.  If you have experience with the Linhof Techno I’d be delighted to hear your experience with it.